Easy-Peasy Lampshade Cover

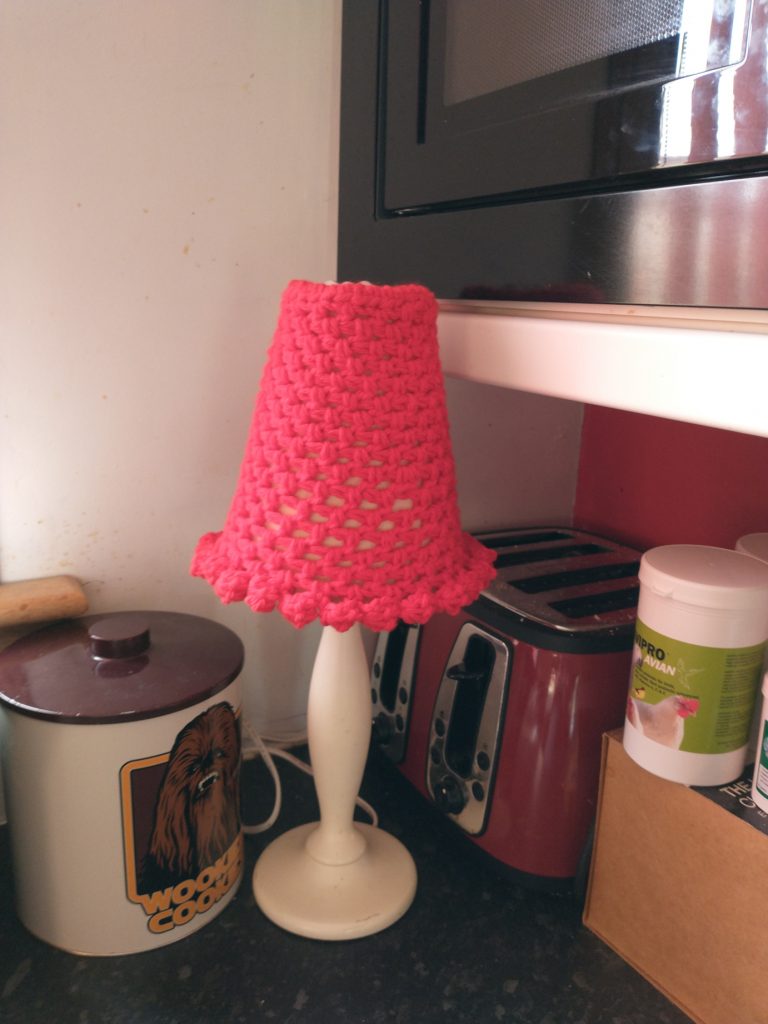
The shade of the little lamp in my kitchen was looking a bit worse for wear, so I decided to crochet a quick cover for it.
The pattern is very simple and should work for any lampshade that tapers like this one with adjustments for size.
Materials
I used a chunky yarn – Hayfield Bonus Chunky Signal Red (it looks pink in the photo, but is definitely red 🙂 ). I made sure it was also an easy wash yarn as cooking grease and such are likely to stick to it over time. I probably used about 20g of yarn for this size lamp.
- Yarn of your choice
- 6mm hook
- Stitch Marker
- Tapestry needle to sew in ends
Skill Level
Fairly easy, but you will need to be able to crochet half double crochet (UK = htr) and single crochet (UK=dc) stitches, to increase in the round and to crochet bobble stitches in sc. You’ll also need to be able to adjust the pattern on the fly to suit your particular lampshade by adding extra increase stitches of rows if you feel it is getting too tight for your lampshade.
Abbreviations
Please note that I use US crochet terms throughout. I am actually British, but I find the US terms more intuitive.
sc – single crochet (UK = dc)
hdc – half double crochet (UK = htr)
sl – slip stitch
ch – chain
st – stitch
inc – increase by crocheting 2 stitches in one stitch
Y/O – Yarn Over
F/O – Fasten Off
Special Stitch
4-stitch sc bobble : Insert hook through st, Y/O and pull through loop – repeat 4 times until there are 5 loops on the hook. Y/O and pull through all 5 loops. ch 1 to complete.
Pattern
How this pattern proceeds will very much depend on the shape and size of your lampshade, but the basic techniques are listed below:
Round 1: ch x, where x is the number of chains that is required to make a snug circle around the outside of the top of your lampshade. For my little shade, which has a very narrow top, it was 30 ch. sl st for form a circle.
Round 2: hdc around (x stitches), sl st to join
Round 3: inc, ch 1 (skip the next st, hdc, ch 1)*, repeat * until you are about halfway
(at the opposite side of the circle), then inc again. [You could increase on the first and last stitches to keep it simple, but if you do that over a number of rows you’ll end up with a cone skewed to one side.] Repeat * to end (x + 2)
Round 4: hdc in each ch 1 space, ch 1 and skip each hdc around (x + 2).
At this point I stopped using slip stitches to join and went with the amigurumi method instead, but it is up to you what you want to use and feel most comfortable with. Just note that with the sl st method you will probably see a visible join.
Keep repeating rows 3 and 4 until the cover is large enough to fit your lampshade. Stop after every few rows and fit it to make sure that it isn’t getting too tight. If that happens you may need to add an extra increase row or a couple of extra increase stitches in one row to accommodate the shape of your lampshade. The cover should be snug enough that it doesn’t fall off, but not so tight that you have to stretch it to fit it.
Keep a good count of your stitches in each row. Each ch 1 also counts as a stitch. You may need to work between the increased hdc stitches in some rows to get the count right, in others you will skip both hdc stitches and add an extra ch 1 at the end instead to keep the pattern even.
Final Round: To add the little bobbles at the bottom of the lamp shade cover, in each ch 1
space – (sl st, ch 2, 4 st sc bobble in the first ch, ch 1)* – repeat * to end, F/O. Sew in ends using a tapestry needle.
As usual, if you have any issues or questions, you can contact me via email, Facebook or Mastodon.
The Legal Stuff
Copyright 2020- Cazimodo Creative by Caz Thomson. I am very happy for you to make and also sell items using this pattern, but please don’t sell or otherwise distribute the pattern itself. Please credit me with a link to the pattern if you do sell your finished item online.


