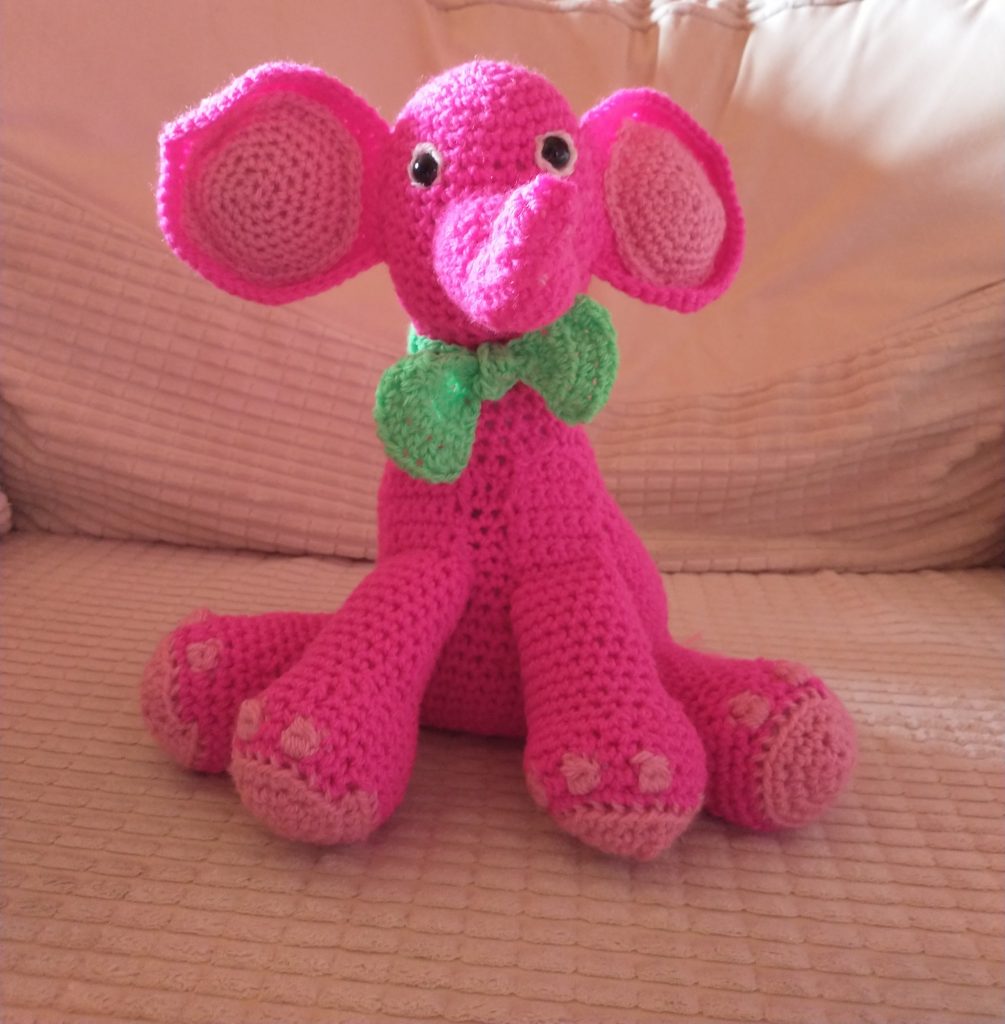
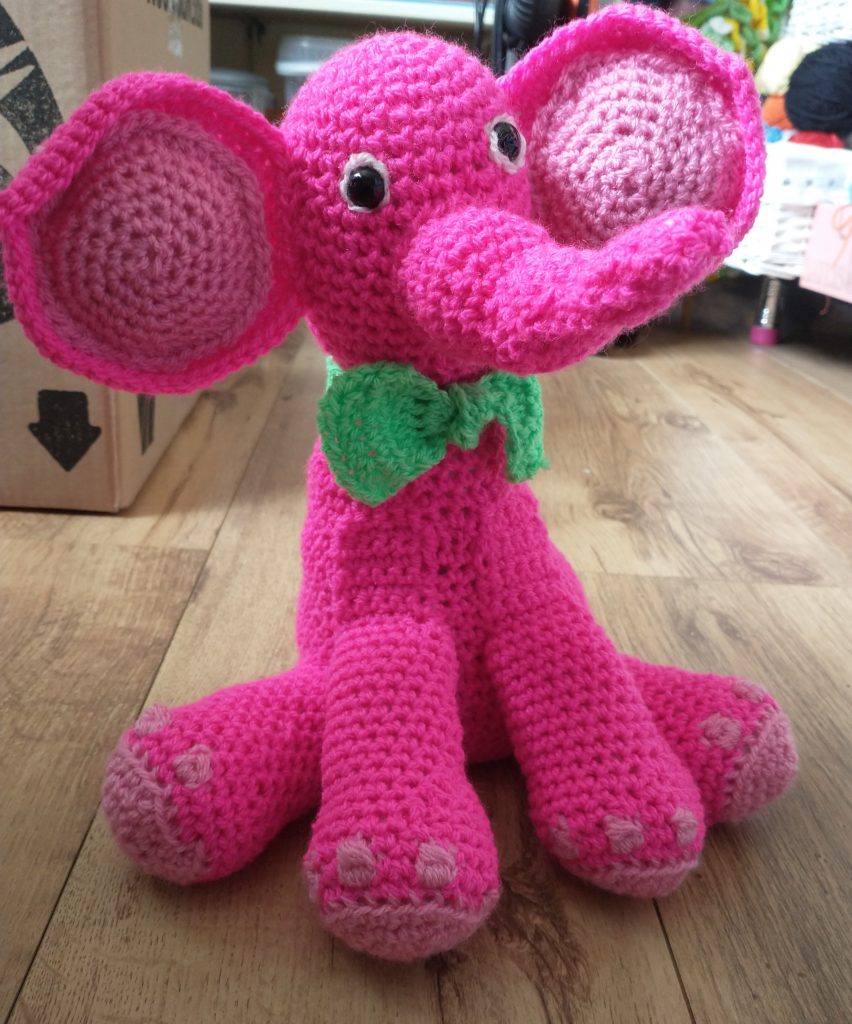
Mum’s Pink Elephant
My Mum recently came to stay for a while and we ended up talking about an elephant I had made her from a pattern a few years ago, which she has kept on her bed ever since. They had recently moved back to Scotland from South Africa at that time and their stuff was still in storage as the Covid-19 situation had stopped them from house hunting, so I decided to make my own pattern this time and give her a new, pink, elephant for her bed. And isn’t he a handsome chap!
Materials
- Approximately 80 g of Bright Pink DK yarn, 30 g of Light Pink DK Yarn, oddments of Bright Green and White DK yarn
- 4 mm crochet hook
- Tapestry needle
- 2 x 10 mm black safety eyes
- Stitch marker
- Toy Stuffing
I used the following yarns:
Bright Pink – I can’t remember what this one was, but I think it was a King Cole yarn
Light Pink – Stylecraft Special DK Fondant
Bright Green – Stylecraft Special DK Bright Green
White – StyleCraft Special DK White
Skill Level
Easy. You will need to be able to work sc and hdc stitches, to increase and decrease and to change colours in the round.
Abbreviations
Please note that I am using US crochet terms throughout. I am actually British, but I find the US terms more intuitive.
sc – single crochet (UK = dc)
hdc – half double crochet (UK = htr)
sl – slip stitch
ch – chain
mr – magic ring
st – stitch
inc – increase by 2 st (2 stitches into the same stitch from previous row)
dec – decrease over 2 st (1 stitch across 2 stitches from previous row)
start(x) – Either mr (x sc in mr) or ch2, x sc in 2nd chain from hook – whatever you like best [I am personally not a fan of mr and just stick to the ch2 method]
(x) – x = number of stitches at end of round
Y/O – Yarn Over
F/O – Fasten Off
BLO- Back Loops Only
Special Stitch – 5 sc Bobble
(Insert hook through st, Y/O and pull through one loop) *, repeat * 5 times. Y/O and pull through all the remaining loops on the hook. Ch 1 to finish bobble.
Pattern
Outer Ears (with Bright Pink, make 2)
Round 1: start(6)
Round 2: inc*, repeat * around (12)
Round 3: (1 sc, inc)* – repeat * around (18)
Round 4: (2 sc, inc)* – repeat * around (24)
Round 5: (3 sc, inc)* – repeat * around (30)
Round 6: (4 sc, inc)* – repeat * around (36)
Round 7: (5 sc, inc)* – repeat * around (42)
Round 8: (6 sc, inc)* – repeat * around (48)
Round 9: 48 sc around
F/O
Inner Ears (with Light Pink, make 2)
Round 1: start(6)
Round 2: inc*, repeat * around (12)
Round 3: (1 sc, inc)* – repeat * around (18)
Round 4: (2 sc, inc)* – repeat * around (24)
Round 5: (3 sc, inc)* – repeat * around (30)
Round 6: (4 sc, inc)* – repeat * around (36)
Round 7: (5 sc, inc)* – repeat * 4 times, 12 sc (40).
F/O
Eyeballs (with White, make 2)
Round 1: start(6)
F/O
Head (with Bright Pink)
Round 1: start(6)
Round 2: inc*, repeat * around (12)
Round 3: (1 sc, inc)* – repeat * around (18)
Round 4: (2 sc, inc)* – repeat * around (24)
Round 5: 24 sc around
Round 6: (3 sc, inc)* – repeat * around (30)
Rnds 7-8: 30 sc around
Place the safety eyes into the centre of the eyeballs and through the head at around row 7 or 8 (see photo for guide).
Round 9: (4 sc, inc)* – repeat * around (36)
Rnds 10-15: 36 sc around
Round 16: (4 sc, dec)* – repeat * around (30)
Round 17: 30 sc around
Round 18: (3 sc, dec)* – repeat * around (24)
Round 19: (2 sc, dec)* – repeat * 4 times, 8 sc (20)
F/O and stuff head
Body (with Bright Pink)
Round 1: start(6)
Round 2: inc*, repeat * around (12)
Round 3: (1 sc, inc)* – repeat * around (18)
Round 4: (2 sc, inc)* – repeat * around (24)
Round 5: (3 sc, inc)* – repeat * around (30)
Round 6: (4 sc, inc)* – repeat * around (36)
Round 7: (5 sc, inc)* – repeat * around (42)
Round 8: (6 sc, inc)* – repeat * around (48)
Round 9: (7 sc, inc)* – repeat * around (54)
Rnds 10-13: 54 sc around
Round 14: (7 sc, dec)* – repeat * around (48)
Rnds 15-16: 48 sc around
Round 17: (6 sc, dec)* – repeat * around (42)
Rnds 18-19: 42 sc around
Round 20: dec, dec, 34 sc, dec, dec (38)
Round 21: 38 sc around
Round 22: 2 sc, dec, dec, 26 sc, dec, dec, 2 sc (34)
Rnds 23-24: 34 sc around
Round 25: 4 sc, dec, dec, 18 sc, dec, dec, 4 sc (30)
Rnds 26-27: 30 sc around
Round 28: (2 sc, dec)* – repeat * around (24)
Rnds 29-31: 24 sc around
F/O and stuff body
Back Legs (with Light Pink, Bright Pink, make 2)
Round 1: with Light Pink, start(6)
Round 2: inc*, repeat * around (12)
Round 3: (1 sc, inc)* – repeat * around (18)
Round 4: (2 sc, inc)* – repeat * around (24)
Round 5: Change to Dark Pink. Do not break off Light Pink. 24 sc in BLO
Round 6: 3 sc, changing to Light Pink on last st;
5 sc Bobble, changing to Dark Pink on the last st;
2 sc, changing to Light Pink on the last st;
5 sc Bobble, changing to Dark Pink on the last st;
2 sc, changing to Light Pink on the last st;
5 sc Bobble, changing to Dark Pink on the last st;
14 sc (24)
Break off Light Pink and weave in ends
Rnds 7-8: 24 sc around
Round 9: dec, 20, dec (22)
Round 10: 2 sc, dec, 14 sc, dec, 2 sc (20)
Rnds 11-12: 20 sc around
Round 13: 3 sc, dec, 10 sc, dec, 3 sc (18)
We are now going to add a flap that allows the leg to be sewn onto the body cleanly so the elephant can sit flat as shown in the photo. The directions will differ slightly for each leg, so make sure you are working the correct leg each time.
Left Back Leg Only
Rnds 14-18: 18 sc around
Stuff the leg, being careful not to over stuff.
Round 19: 10 sc, mark with a stitch marker; 8 sc, turn
Rnds 20-24: 8 sc, turn
Round 25: dec, 4 sc, dec, turn (6)
Round 26: dec, 2 sc, dec, turn (4)
Rnds 27-29: 4 sc, turn
F/O
Right Back Leg Only
Rnds 14-17: 18 sc around
Round 18: turn; 10 sc, mark with a stitch marker, turn
Stuff the leg, being careful not to over stuff.
Round 19: 8 sc, turn, join to previous round with a sl st
Rnds 20-24: 8 sc, turn
Round 25: dec, 4 sc, dec, turn (6)
Round 26: dec, 2 sc, dec, turn (4)
Rnds 27-29: 4 sc, turn
F/O
Front Legs (with Light Pink, Bright Pink, make 2)
Rnds 1-13: Work the same as rounds 1-13 of Back Legs
Rnds 14-16: 18 sc around
Round 17: dec, 14 sc, dec (16)
Rnds 18-22: 16 sc around
Round 23: dec, 12 sc, dec (14)
We will also make flaps for the front legs so that they can be sewn to the front of the body. It does not matter which leg goes where this time.
Round 24: sl st x 3; 6 sc, turn
Rnds 25-30: 6 sc, turn
F/O
Trunk (with Bright Pink)
Round 1: ch 18; join with a sl st
Rnds 2-3: 18 sc around
Round 4: dec, 14 sc, dec (16)
Round 5: 16 sc around
Round 6: 1 sc, dec, 10 sc, dec, 1 sc (14)
Round 7: 14 sc around
Round 8: dec, 10 sc, dec (12)
Round 9: 12 sc around
Round 10: 1 sc, dec, 6, dec, 1 sc (10)
Round 11: 10 sc around
Round 12: dec, 6 sc, dec (8)
Rnds 13-16: 8 sc around
Round 17: 1 sc, dec, 2 sc, dec, 1 sc (6)
Rnds 18-19: 6 sc around
Round 20: dec, 2 sc, dec (4)
Round 21: 4 sc around
F/O
Tail (with Light Pink)
Using 2 strands of Light Pink yarn held together, ch 14. F/O, leaving two strands at the bottom of the tail, Use Light Pink Yarn to pull through another few strands at the bottom of the tail using the method for creating fringes on scarves (check out YouTube for lots of videos on how to do this).
Cut the strands to the same size.
Necktie (with Bright Green)
Round 1: ch 11, hdc in the second chain from hook, hdc across, turn (9)
Round 2: dec, 5 hdc, dec (7), turn
Round 3: dec, 3 hdc, dec (5), turn
Round 4: dec, 1 hdc, dec (3), turn
Rnds 5-31: 3 hdc, turn
Round 32: inc, 1 hdc, inc (5), turn
Round 33: inc, 3 hdc, inc (7), turn
Round 34: inc, 5 hdc, inc (9), turn
Round 35: 9 sc;
F/O
Assembly
- Lightly stuff the Inner Ears and sew them onto the Outer Ears
- Sew the Ears onto the side of the Head
- Using White, sew edges of the eyeballs onto the Head
- Lightly stuff the Trunk and sew it onto the Head using the photo as a guide
- Sew the Head onto the Body, making sure there is enough stuffing between the two to keep the neck firm so the Head is held upright
- Sew Tail onto the rear of the Body. Keep in mind that the elephant will be sitting down on his tail
- Sew the Back legs on to the sides of the rear of the Body, making sure you sew the correct flap for each leg and so that the legs are splayed out as in the photo
- Sew the front legs onto the front of the Body using the flaps to align them.
- Put the Tie around his neck and knot. You can also sew it on if you like.
I hope you enjoy this pattern. If you want to chat to me, please feel free to contact me on any of my social links.
The Legal Stuff
Copyright 2020- Cazimodo Creative by Caz Thomson. I am very happy for you to make and also sell items using this pattern, but please don’t sell or otherwise distribute the pattern itself. Please credit me with a link to the pattern if you do sell your finished item online.