Witchy-Poo
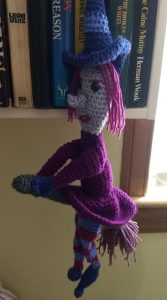
Who doesn’t need a witch on a broomstick flying around their room?
Materials
- Approx 15-40g of various DK Yarns
- 4 mm crochet hook
- Tapestry Needle
- Stitch marker
- 2 x 10mm safety eyes
- Toy stuffing
I used the following colours for Witchy-Poo, but you can use whatever you prefer.
Colour 1:
Good Old Fashioned DK Violett (yes it is spelled like that :))
Colour 2:
Stylecraft Special DK Bluebell
Colour 3:
Stylecraft Special DK Lobelia
Colour 4:
Stylecraft Special DK Grey
Colour 5:
Stylecraft Special DK Plum
Colour 6:
Stylecraft Special DK Grape
Colour 7:
Stylecraft Special DK Silver
Skill Level – Easy
You will need to be able to crochet single crochet (UK =double crochet) in the round in the amigurumi style, to change colours and to work in the front and back loops of stitches. You will need to be able to do a 5-sc bobble for the “thumbs” on her gloves, but this is explained at that point.
Abbreviations
Please note that I am using US crochet terms throughout. I am actually British, but I find the US terms more intuitive.
sc – single crochet (UK = dc)
hdc – half double crochet (UK = htr)
dc – double crochet (UK = tr)
sl – slip stitch
ch – chain
mr – magic ring
st – stitch
inc – increase by 1 st (2 stitches into the same stitch from previous row)
dec – decrease over 2 st (1 stitch across 2 stitches from previous row)
start(x) – Either mr (x sc in mr) or ch2, x sc in 2nd chain from hook – whatever you like best [I am personally not a fan of mr and just stick to the ch2 method]
(x) – x = number of stitches at end of round
Y/O – Yarn Over
F/O – Fasten Off
BLO– Back Loops Only
Pattern
Shoes (make 2 with Colour 3)
Round 1: start(3)
Round 2: 3 sc around
Round 3: inc, 2sc (4)
Round 5: 4 sc around
Round 6: inc, 2 sc, inc (6)
Round 7: 6 sc around
Round 8: 1 sc, inc, 2 sc, inc, 1 sc (8)
Rnds 9-10: 8 sc around
Round 11: 4 sc, inc, 2 sc inc (10)
Round 12: 10 sc around
Stuff shoes very lightly
Round 13: dec, 4 sc, dec, 2 sc (8)
Round 14: 2 sc, dec, 2 sc, dec (6)
Round 15: 6 sc around
Round 16: 6 sc BLO
F/O
Legs (with Colour 2, Colour 5, make 2)
Change colour after every 3 rows. Do not stuff
Round 1: Starting with Colour 2 and working on top of foot and in front loops from the last row of Shoe, 6 sc. Join with sl st
Rnds 2-4: 6 sc around
Round 5: inc, 4 sc, inc (8)
Rnds 6-7: 8 sc around
Round 8: inc, 6 sc, inc (10)
It doesn’t really matter where you add the increases, but if you always add them at the front and back of each row you’ll end up skew cone instead of a straighter leg, so I have moved the increases around a bit.
Rnds 9-15: 10 sc around
Round 16: 4 sc, inc, 4 sc, inc (12)
Round 17: 5 sc, inc, inc, 5 sc (14)
Rnds 18-22: 14 sc around
Round 23: inc, 12 sc, inc (16)
Rnds 24-26: 16 sc around
Round 27: 6 sc, inc, 6 sc, inc, inc (18)
Rnds 28-30: 18 sc around
Round 31: 18 sc FLO
Skirt (with Colour 1)
Round 1: start(6)
Round 2: inc * – repeat * around (12)
Round 3: (1 sc, inc) * – repeat * around (18)
Round 4: (2 sc, inc) * – repeat * around in BLO (24)
Round 5: (3 sc, inc) * – repeat * around (30)
Round 6: (4 sc, inc) * – repeat * around (36)
Round 7: (5 sc. inc) * – repeat * around (42)
Round 8: (6 sc, inc) * – repeat * around (48)
Round 9: (7 sc, inc) * – repeat * around (54)
Round 10: (8 sc, inc) * – repeat * around (60)
Rnds 11-13: 60 sc around in BLO
F/O
Dress (with Colour 1)
We want a cone shape here so we’ll increase and decrease at the start and finish of each round.
Round 1: Working in front loops of round 4 of Skirt, 24 sc; join with a sl st
Round 2: 24 sc around
Round 3: dec, 20 sc, dec (22)
Rnds 4-5: 22 sc around
Round 6: dec, 18 sc, dec (20)
Rnds 7-8: 20 sc around
Round 9: dec, 16 sc, dec (18)
Round 10: 18 sc around
Round 11: dec, 14 sc, dec (16)
Round 12: 16 sc around
Round 13: dec, 12, dec (14)
Round 14: 14 sc around
Round 15: dec, 10 sc, dec (12)
Round 16: 12 sc around
Stuff Dress, being careful not to overstuff
F/O
Hat (with Colour 2, Colour 3)
Change colours after every 3 rows
Round 1: starting with Colour 3, ch 16; join with a sl st
Round 2-3: 16 sc around
Round 4: dec, 12 sc, dec (14)
Round 5: 14 sc around
Round 6: dec, 10 sc, dec (12)
Round 7: 12 sc around
Round 8: 2 sc, dec, 4 sc, dec, 2 sc (10)
Round 9: 10 sc around
Round 10: dec, 6 sc, dec (8)
Rnds 11-12: 8 sc around
Round 13: 1 sc, dec, 1 sc, dec 2 sc (6)
Rnds 14-21: 6 sc around
Round 22: dec, 2 sc, dec (4)
Rnds 23-24: 4 sc around
Round 25: dec around (2)
F/O leaving tails from both colours for hanging your with up later
Hat Brim (with Colour 3)
Round 1: Join in with a sl st and sc in the BLO of the first row of the hat (16)
Round 2: 16 sc around
Round 3: inc, 14 sc, inc (18)
Round 4: 2 sc, inc, 14 sc, inc, inc, 2 sc (21)
Round 5: 2 sc, inc, 4 sc, inc, 4 sc, inc, 4 sc, inc, 2 sc (24)
Round 7: (3 sc, inc) * – repeat * around (30)
Round 8: (4 sc, inc) * – repeat * around (36)
Round 9: (5 sc, inc) * – repeat * around (36)
Round 10: (6 sc, inc) * – repeat * around (42)
Round 11: (7 sc, inc) * – repeat * around (48)
Round 12: (8 sc, inc) * – repeat * around (54)
Round 13: (9 sc, inc) * – repeat * around (60)
F/O
Head (with Colour 7)
Place safety eyes around rows 6-7
Round 1: start(6)
Round 2: inc * – repeat * around (12)
Round 3: (1 sc, inc) * – repeat * around (18)
Round 4: (2 sc, inc) * – repeat * around (24)
Rnds 5-10: 24 sc around
Round 11: inc, 22 sc, inc (26)
Round 12: 26 sc around
Round 13: dec, 22 sc, dec (24)
Round 14: (2 sc, dec) * – repeat * around (18)
Round 15: 18 sc around
Stuff head lightly
Round 16: (1sc, dec) * – repeat * around (12)
Round 17: 12 sc around
Round 18: dec * – repeat around (6)
F/O
Nose (with Colour 7)
Do not stuff
Round 1: start(6)
Round 2: 6 sc around
Round 3: dec, 4 sc (5)
Round 4: dec, 3 sc (4)
Round 5: 3 sc around
Round 6: 1 sc, dec (2)
Round 7: dec (1)
F/O
Arms (make 2 with Colour 1)
Do not stuff
Round 1: ch 15, join with sl st
Round 2: 15 sc around
Round 3: dec, dec 9 sc, dec (12)
Round 4: 12 sc in FLO
Rnds 5-6: 12 sc around
Round 7: dec, 2 sc, dec, dec, 4 sc in BLO (9)
Rnds 8-9: 9 sc around
Round 10: dec, 7 sc (8)
Rnds 11-12: 8 sc around
Round 13: 1 sc, dec, 3 sc, dec (6)
Round 14: 6 sc around
Round 15: 6 sc FLO
F/O:
Gloves (make 2 with Colour 3)
Special Stitch: 5-sc bobble: Insert hook into st and yarn over and pull through a loop. Y/O and pull through 1 loop x 5; Y/O and pull through all remaining loops.
Round 1: start (8)
Round 2: 8 sc around
Round 3: 2 sc, 5-sc bobble, 5 sc (8)
Round 4: 8 sc around
Round 5: dec, 4 sc, dec (6)
Round 6: 6 sc around
F/O
Broomstick (with Colour 4)
Round 1: start(6)
Round 2: inc, 4 sc, inc (8)
Repeat 8 sc around until the broomstick measures about 26 cm long. Stuff lightly as you go along. F/O. Sew up end.
Assembly

- To create Witchy-Poo’s hair, cut equal strands of Colour 5 and use the crochet hook to thread them through her head in the same manner as you would if you were making a tassel for a scarf (https://www.dummies.com/crafts/crocheting/how-to-add-fringe-to-crochet/). Keep doing this until she has the hairstyle you like.
- Sew on facial features like mouth and eyebrows. I used Colour 5 again for these.
- Stuff the bottom of the Hat lightly and sew onto the Head.
- Sew the Head to the body.
- Squish the Nose and sew it to the Head using the picture for reference.
- Sew the Gloves to the bottom of the Arms through the back loops left from the last row so that the Gloves start inside the sleeves of the Arms.
- Sew the Arms to the top of the Dress.
- Sew the Legs to the bottom of the Dress underneath the Skirt.
- Using Colour 6, create the Broom bristles in the same way as you did Witchy-Poo’s hair.
- Position Witchy-Poo on the Broom and sew her Gloves lightly to each side.
- Using the extra strands left on her Hat, hang her up where she can fly free.
That’s it. She should be flying now 🙂 I hope you enjoy the pattern. If you have any issues, feel free to contact me via email of on the Twitter of Facebook accounts. There’ s also chat available via this website if you need to get me in a hurry and I am online.
The Legal Stuff
Copyright 2020- Cazimodo Creative by Caz Thomson. I am very happy for you to make and also sell items using this pattern, but please don’t sell or otherwise distribute the pattern itself. Please credit me with a link to the pattern if you do sell your finished item online.