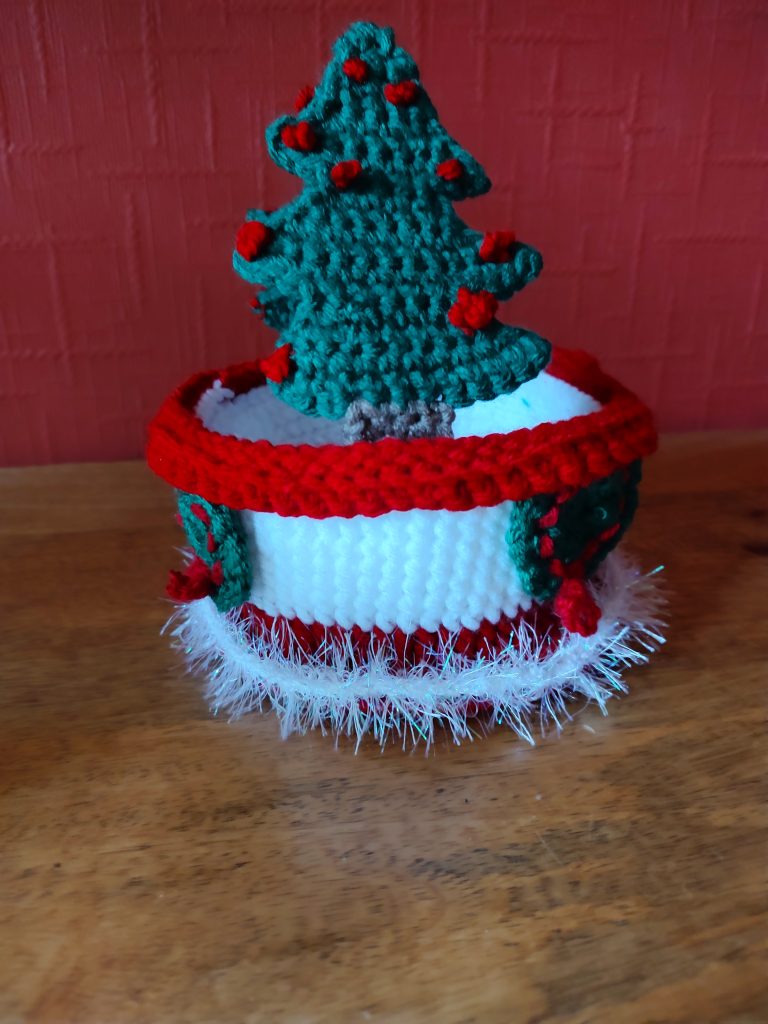
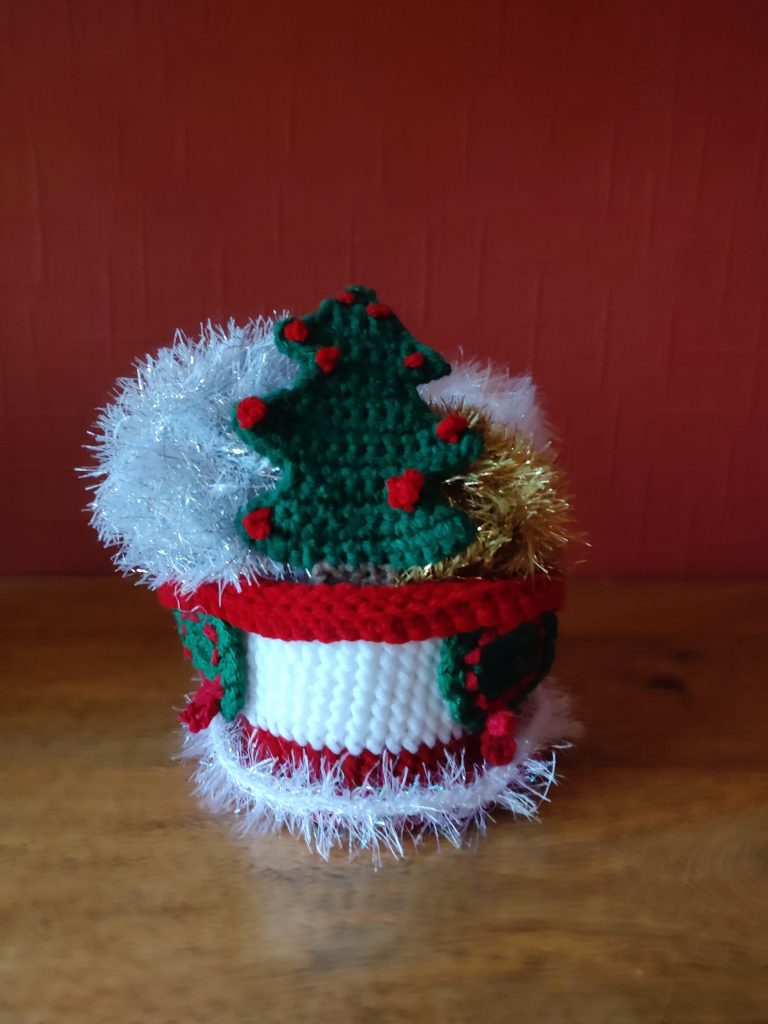
Wreaths and Trees Treat Basket
This is the first little basket I made this year. I made this a little smaller than the Basic Treat Basket size before I decided to go a little bigger with the other ones. I have some small toiletry gifts that will go nicely into this basket.
Materials
- Yarn as indicated below
- Crochet hooks: 6 mm, 5.5 mm, 4 mm, 3.5 mm
- Stitch marker
- Tapestry needle
Yarn
- Red – Paintbox Yarns Simply Chunky Pillar Red (314)
- White – Yarnsmiths Create Chunky White (5040)
- Green – Yarnsmiths Create Chunky Christmas Green (5210)
- Tinsel White – King Cole Tinsel Chunky Icicle (3424)
- The wreaths are actually made with Green and Red DK yarn, but I don’t have the ball bands for those. Any Green or Red DK yarn should do
Skill Level
Easy, but this is not a beginner pattern as you need to be able to work front post single crochet stitches and to increase and decrease stitches. You will need to be able to crochet in both the back loops and front loops only on certain rounds.
You will also need to know how to double crochet (UK=treble crochet) and make hdc (UK=htr) crochet stitches. You will also need to be able to change colours and work in the round both using slip stitches and by the amigurumi method.
Abbreviations
Please note that I am using US crochet terms throughout. I am actually British, but I find the US terms more intuitive. Measurements are always metric.
sc – single crochet (UK = dc)
hdc – half double crochet (UK = htr)
dc – double crochet (UK = tr)
fpsc – front post single crochet (UK = fpdc)
sl – slip stitch
ch – chain
mr – magic ring
st – stitch
inc – increase by 2 st (2 stitches into the same stitch from previous row)
dec – decrease over 2 st (1 stitch across 2 stitches from previous row)
start(x) – Either mr (x sc in mr) or ch 2, x sc in 2nd chain from hook – whatever you like best [I am personally not a fan of mr and just stick to the ch 2 method]
(x) – x = number of stitches at the end of round
BLO – Back Loops Only
FLO – Front Loops Only
Y/O – Yarn Over
F/O – Fasten Off
Pattern
Basket Base (with Red)
Crochet the Basket Base for a Basic Treat Basket all in Red.
Basket Body (with Red, White)
Crochet the Basket Body for a Basic Treat Basket using:
Rnds 1-3 : Red
Rnds 4-11: White
Rnds 12-14: Red
Round 15: Red
Wreaths (with Green, Red, 3.5 mm hook, make 4)
Round 1: with Green, ch 9, join with a sl st
Round 2: 12 sc in the center of the ring
Round 3: Round 3: (1 sc, inc)* – repeat * around (18), join with a sl st into first sc
Round 3: (1 sc, ch 2, miss next st)* – repeat * around, join with a sl st into first sc.
You should have 10 ch2 spaces at the end of the round
Round 4: (sl st, 3 dc in each ch 2 space) * – repeat * around; join with a sl st into first sc from previous round
F/O leaving a long tail for sewing
With Red, ch 69. F/O and weave in ends
Pull chain evenly through the chain 2 spaces of Round 3 under the sl and dc clusters and tie in a bow.
Trees (with Green, Red, 4 mm hook, make 2)
Two trees should be enough if you are not going to put anything too heavy into the basket, but otherwise it might be worth crocheting four of them and sewing each pair together for a bit more strength. You could also add a little stuffing if you like.
Row 1: with Green, ch 2, work 2 sc in the 2nd ch from hook (2)
Row 2: Ch 1 (does not count as a stitch here and throughout), turn, sc inc in first sc, sc in next (3)
Rows 3-5: Ch 1, turn, sc inc in first st, sc in each st to end of row. (6 at end of Row 5)
Rows 6-7: Ch 1, turn, sc inc in first st, sc in each st to last, sc inc in last st (10 at end of Row 7)
Row 8: Ch 1, turn, sl st in the first 3 st, sc inc in next st, sc in the next 3 st, Leave remaining sts unworked (5)
Row 9: Ch 1 turn, sc inc in first st, sc in next 4 st (6)
Rows 10-13: Ch 1 turn, sc inc in the first st, sc in each st to last, sc in in last st (14 at the end of Row 13)
Row 14: Ch 1, turn, sl st in first 4 sts, sc inc in next st, sc in next 5 st, Leave remaining sts unworked (7)
Row 15: Ch 1, turn sc inc in first st, sc in the next 6 sts (8)
Rows 16-18: Ch 1, turn, sc inc in first st, sc in each st to last, sc inc in last st (14 at end of Row 18)
F/O leaving a tail for sewing tree tips together
Trunk Row 19: On RS join in Brown with an sc in 6th st of Row 18, sc in next 3,
Leave rem sts unworked (4 sc)
Rows 20-23: Ch1, turn, sc in each st across (4)
F/O leaving a long tail for sewing to basket body
Assembly
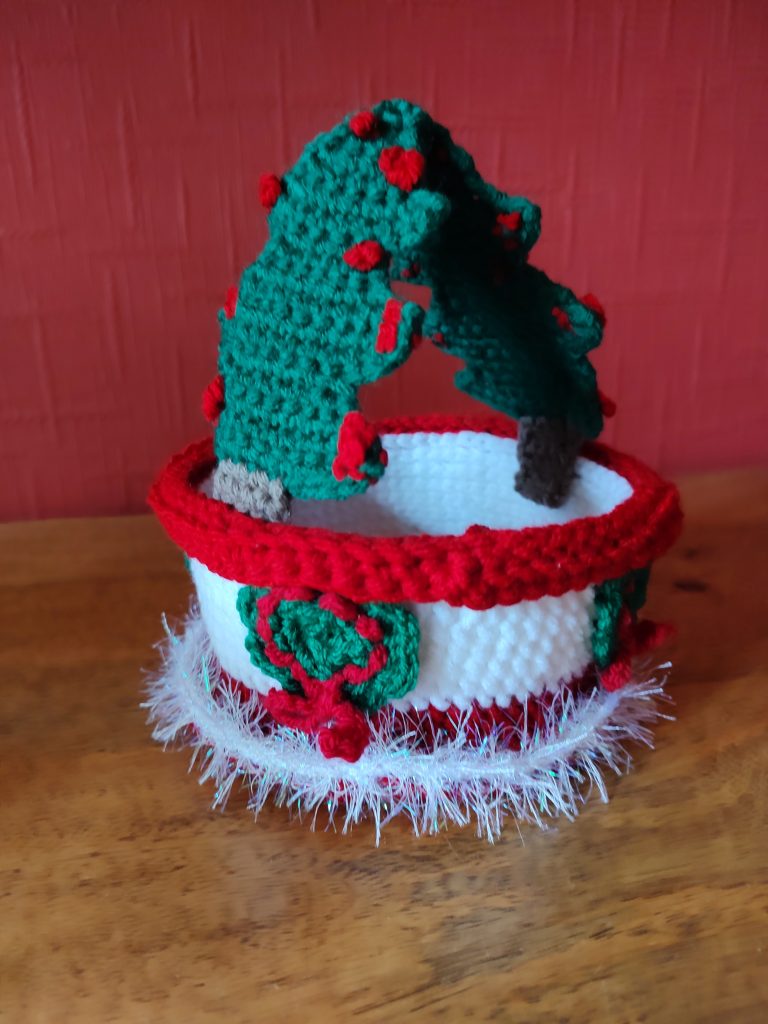
- Sew the 4 wreaths onto the basket body evenly spaced around in the middle white space of the basket and slightly under the red rim.
- Sew baubles onto the trees using French knots (or something approximately like a French knot if you are rubbish at embroidery like me 🙂
- Sew the trees onto the basket using the trunks. Allow a little of the trunk to show above the rim of the basket.
- Sew the tips of the trees together to form the handle.
- Crochet a row of Tinsel White around the base row of the basket
- Weave in all loose ends
All done! Fill with little treats and present to your special someone on the big day.
The Legal Stuff
Copyright 2023- Cazimodo Creative by Caz Thomson. I am very happy for you to make and also sell items using this pattern, but please don’t sell or otherwise distribute the pattern itself. Please credit me with a link to the pattern if you do sell your finished item online.