D.B. McKurkin
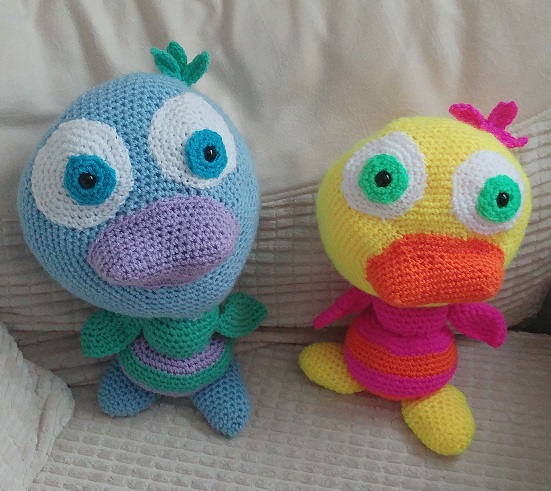
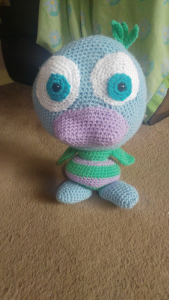
Double Beak (D.B.) McKurkin is a bit of a mystery, There is a story that he hijacked a flock of geese and made them give him 200 000 squid before he parachuted away into legend, but nobody can say for sure. All that we know is that D.B. isn’t an Earth species of duck, and that he is known to manifest in various different forms.
Materials
- Approximately 50-60 g of Yarn Colour A, and about 5-6 g of each of the other colours
- (using DK yarn)
- 4 mm crochet hook (if using DK yarn)
- Tapestry Needle
- Stitch marker
- 2 x 12 mm safety eyes
- Toy Stuffing
Colour A:
Used for Head and Feet –
D.B. One : Stylecraft Special DK – 1019 – Cloud Blue
D.B. Two : King Cole Pricewise DK – 038 – Acid
Colour B:
Used for Beak and alternate body stripes –
D.B. One : Stylecraft Special DK – 1432 – Wisteria
D.B. Two : King Cole Pricewise DK – 144 – Orange
Colour C:
Used for Neck, alternate body stripes and Head Feathers –
D.B. One : Hayfield Bonus DK – 704 – Gala Green
D.B. Two : Hayfield Bonus DK – 737 – Fluoro
Colour D:
Used for the iris colour of the Eyes –
D.B. One : Stylecraft Special DK – 1068 – Turquoise
D.B. Two : Stylecraft Special DK – 1259 – Bright Green
White:
Used for the Eyes
Skill Level
Easy. You will need to be able to work single crochet (sc), change colours and increase and decrease.
Abbreviations
Please note that I am using US crochet terms throughout. I am actually British, but I find the US terms more intuitive.
sc – single crochet (UK = dc)
hdc – half double crochet (UK = htr)
dc – double crochet (UK = tr)
sl – slip stitch
ch – chain
mr – magic ring
st – stitch
inc – increase by 1 st (2 stitches into the same stitch from previous row)
dec – decrease over 2 st (1 stitch across 2 stitches from previous row)
start(x) – Either mr (x sc in mr) or ch2, x sc in 2nd chain from hook – whatever you like best [I am personally not a fan of mr and just stick to the ch2 method]
(x) – x = number of stitches at end of round
Y/O – Yarn Over
F/O – Fasten Off
BLO– Back Loops Only
Pattern
Head (with Colour A)
Round 1 : start(6)
Round 2: inc around (12)
Round 3: (1sc; inc) * – repeat * around (18)
Round 4: (2 sc; inc) * – repeat * around (24)
Round 5: (3 sc; inc) * – repeat * around (30)
Round 6: (4 sc; inc) *- repeat * around (36)
Round 7: (5 sc; inc) * – repeat * around (42)
Round 8: (6 sc; inc) * – repeat * around (48)
Round 9: (7 sc; inc) * – repeat * around (54)
Round 10: (8 sc; inc) * – repeat * around (60)
Round 11: (9 sc; inc) * – repeat * around (66)
Round 12: (10 sc; inc) * – repeat * around (72)
Round 13: (11 sc; inc) * – repeat * around (78)
Round 14: (12 sc; inc) * – repeat * around (84)
Rounds 15-28: 84 sc around
Round 29: (12 sc, dec)* – repeat * around (78)
Round 30: (11 sc, dec)* – repeat * around (72)
Round 31: (10 sc, dec)* – repeat * around (66)
Round 32: (9 sc, dec)* – repeat * around (60)
Round 33: (8 sc, dec)* – repeat * around (54)
Round 34: (7 sc, dec)* – repeat * around (48)
Round 35: (6 sc, dec)* – repeat * around (42)
Round 36: (5 sc, dec)* – repeat * around (36)
Round 37: (4 sc, dec)* – repeat * around (30)
Round 38: (3 sc, dec)* – repeat * around (24)
Start stuffing the head at this point
Round 39: (2 sc, dec)* – repeat * around (18)
Round 40: (1 sc, dec)* – repeat * around (12)
Round 41: (dec)* – repeat * around (6)
Stuff more into the head to firm it up – but do not over-stuff. D.B has a big head, so we don’t want to make it too heavy. His head should be well shaped, but squishy instead of firm.
F/O. Leave a long tail for sewing
Beak (With Colour B)
Round 1 : ch 15, 13 sc ( from 2nd chain from hook), inc in last st. 13 ch on opposite side (so that you are crocheting around the starting chain) (27)
Keep working in the round.
Round 2 : inc, 14 sc, inc, 15 sc (33)
Round 3 : inc, 15 sc, inc, 16 sc (35)
Round 4 : inc, 16 sc, inc, 17 sc (37)
Round 5 : inc, 17 sc, inc, 18 sc (39)
Round 6 : inc, 18 sc, inc, 19 sc (41)
Round 7 : 19 sc, inc(3 times), 18 sc, (43)
Round 8-9 : sc around (43)
F/O. Leave a long tail for sewing
Eyes (make 2)
With Colour D:
Round 1: Start(6)
Round 2: inc around (12)
Round 3: (1sc; inc) * – repeat * around (18)
F/O. Leave a long tail for sewing
With White:
Round 1 : start(6)
Round 2: inc around (12)
Round 3: (1sc; inc) * – repeat * around (18)
Round 4: (2 sc; inc) * – repeat * around (24)
Round 5: (3 sc; inc) * – repeat * around (30)
Round 6: (4 sc; inc) *- repeat * around (36)
Round 7: 36 sc around
F/O. Leave a long tail for sewing
Head Feathers (make 3 with Colour 3)
Round 1: ch 6, 5sc from 2nd chain from hook to start of chain. 5sc on opposite side of
chain.
F/O. Leave a long tail for sewing
Body (with Colours B and C)
Note: When changing colours, Y/O with new colour on the last stitch of the previous round and pull through the two loops of the previous colour.
Round 1: With colour C, start(6)
Round 2: inc around (12)
Round 3: (1sc; inc) * – repeat * around (18)
Round 4: (2 sc; inc) * – repeat * around (24)
Round 5: (3 sc; inc) * – repeat * around (30)
Round 6: (4 sc; inc) *- repeat * around (36)
Round 7: (5 sc; inc) * – repeat * around (42)
Round 8: (6 sc; inc) * – repeat * around (48)
Round 9: Change to colour B. 48 sc around
Rounds 10-12: 48 sc around
Round 13: Change to colour C. 48 sc around
Rounds 14-16: 48 sc around
Round 17: Change to colour B. (6 sc, dec)* – repeat around (42)
Round 18: (5 sc, dec)* – repeat * around (36)
Round 19: (4 sc, dec)* – repeat * around (30)
Round 20: (3 sc, dec)* – repeat * around (24)
Start stuffing the body at this point.
Round 21: Change to colour C. (2 sc, dec)* – repeat around (18)
Round 22: (1 sc, dec)* – repeat * around (12)
Round 23: (dec) * – repeat * around (6)
Stuff more into the body if needed. Stuff the body fairly firmly, making sure that the stuffing doesn’t show through your stitches.
F/O. Leave a long tail for sewing
Neck (with Colour C)
Round 1: start(6)
Round 2: inc around (12)
Round 3: (1sc; inc) * – repeat * around (18)
Round 4: (2 sc; inc) * – repeat * around (24)
Round 5: (3 sc; inc) * – repeat * around (30)
Rounds 6-10: 30 sc around
Round 11: (3 sc, dec)* – repeat * around(24)
Start stuffing neck at this point
Round 12: (2 sc, dec)* – repeat * around(18)
Round 13: (1 sc, dec)* – repeat * around(12)
Round 14: (dec)* – repeat * around(6)
Stuff more into the neck if needed. The neck should be stuffed firmly – it is the after all what is required to hold up D.B McKurkin’s big head!. Make sure that the stuffing doesn’t show through your stitches though.
F/O. Leave a long tail for sewing
Wings (make 2 with Colour C)
Round 1: start(6)
Round 2: inc around (12)
Round 3: 12 sc around
Round 4: (1sc, inc)* -repeat around (18)
Round 5: 18 sc around
Round 6: (2 sc, inc)* – repeat around (24)
Round 7: 24 sc around
F/O. Leave a long tail for sewing
Feet(make 2 with Colour A)
Round 1: start(6)
Round 2: inc around (12)
Round 3: 12 sc around
Round 4: (1sc, inc)* -repeat * around (18)
Rounds 5-9: 18 sc around
Round 10: (2 sc inc)* – repeat * around (24)
Round 11-12: 24 sc around
Start stuffing the foot at this point
Round 13: (1sc, dec 2 times)*- repeat * 4 times, sc in last 4 stitches (16)
Round 14: (dec)* – repeat * around (8)
Stuff more into the foot if required, but feet should only be lightly stuffed so that they are mainly flat. This helps to balance D.B. and his big head.
F/O. Leave a long tail for sewing
Assembly
1. Sew the head closed
2. Sew the beak onto the head using the photos as a guide. Stuff only the two bumps that make up his double beak. Leave the rest of the beak un-stuffed
3. Pin the safety eyes through the middle of the iris parts and sew them to the whites of the eyes. Sew the whites of the eyes to the head. Neither of the eye parts are stuffed.
4. Sew the neck to the body. It is important that you sew both the inner part of the circle and then also the outer circle, because this gives the neck the stability it needs to hold up the head.

5. Fold the wings as shown in the photo and sew across (the wings are not stuffed). Sew the wings to the neck with the sewn-up side down as shown in the photos.
6. Sew the feet to the body
7. Sew the head feathers to the head
8. Finally, sew the head to the neck. Make sure that join between head and neck is firm enough for D.B. to be able to hold his head up by himself when he’s sitting up as indicated in the photo.
I hope you enjoy the pattern. If you have any issues, feel free to contact me via email of on the Twitter of Facebook accounts. There’ s also chat available via this website if you need to get me in a hurry and I am online.
The Legal Stuff
Copyright 2020- Cazimodo Creative by Caz Thomson. I am very happy for you to make and also sell items using this pattern, but please don’t sell or otherwise distribute the pattern itself. Please credit me with a link to the pattern if you do sell your finished item online.

