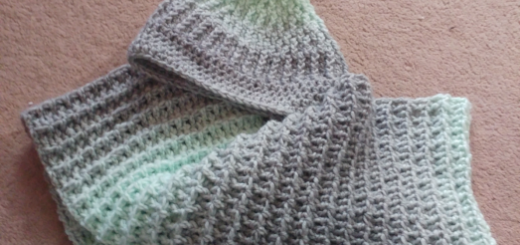
2Teenies

If, like me, you buy crochet or knitting magazines you’ll know that many of them come with little yarn packs attached. The yarn is usually in very small amounts and is meant for you to create one or more of the patterns in the magazine. And if, like me, you don’t use that yarn for the purpose it was meant for – usually in my case, because it is never enough to make the pattern – then you end up with lots of tiny balls of yarn.
This past week I decided to start doing something about that, and so I came up with the idea of the 2Teenies. The rules I set for myself are quite simple, namely:
– I had to use two different colours, and only two colours, for each 2teenie
– the total of the two balls of yarn could not exceed 39 g (40 g is right out, as Monty Python might say)
– each 2teenie had to be simple to make
I used a pack of eight yarn balls, each of them weighing 15 g, to create the first set of 2Teenies above. It was a really fun exercise to do and in some cases quite challenging to finish the 2Teenie without using up all the yarn. It’s worth keeping in mind that in addition to the yarn you’ll need for the various body parts of your 2teenie, you also need to leave some yarn for sewing it all together and you need to take this into account. I used a 3.5 mm hook for all of the 2Teenies in this set.
I have outlined the rough patterns for my four 2Teenies below, but the real fun is in designing your own. All of the 2Teenies use the amigurumi method when working in the round. Crochet Terminology is US as I find this more intuitive. Crochet stitches used include:
- sl st – slip stitch
- ch – chain
- sc – single crochet (UK = dc)
- hdc – half double crochet (UK = htr)
- dc = double crochet (UK = tr)
- tr = treble crochet (UK = dtr)
- dtr = double treble crochet (UK = ttr)
Special Stitches : dc bobble stitches – yarn over hook; insert into stitch, yarn over, pull through a loop, yarn over and pull through 2 loops n (so if is a 4 dc bobble then you do this 4 times) number of times; yarn over and pull through all remaining loops on the hook. Fasten with a ch 1.
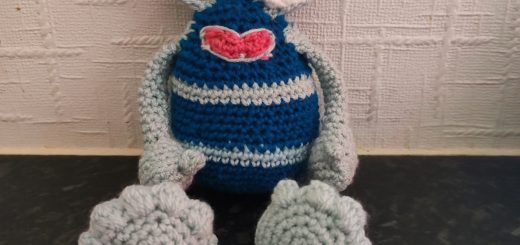
BOOPTEENIE
Boopteenie was the first 2Teenie I made and I didn’t really have a feel yet for how to make one using only 30 g of yarn, so he ended up with tiny little flipper arms as the yarn ran out. I think it just adds to his overall cuteness though. You’ll need 6 mm toy safety eyes and toy stuffing to make Boopteenie.
Body
1: Work increases from 6-18 sc in first colour (in my case this was orange)
2: Work increases from 24-36 sc in the second colour (in my case this was yellow)
3: Work 36 sc x 3 in first colour
4: Work 36 sc x 3 in second colour
5: Work 36 sc x 2 in first colour, then decrease to 30 sc
6: Work, 30 sc in second colour, then decrease to 24 sc, Work another 24 sc
7: Work 18 sc x 2 in first colour, then decrease to 12 sc. Start stuffing at 18 sc so you have enough space.
8: Work 12 sc in second colour, then decrease to 6 sc. Fasten Off.
Feet (make 2. Alternate the colours on different feet)
1: Work increases from 6-12 sc in one colour
2: Work increase to 18 sc in the other colour. Work another 18 sc x 6 in the same colour. Fasten Off. Feet are not stuffed.
Head
1: Work increases from 6-12 sc in first colour (in my case this was orange)
2: Work increase to 18 sc in second colour and then another 18 sc x 5 rounds in same colour (in my case this was yellow)
3: Work 18 sc in first colour, then decrease to 12 and 6 sc in the same colour. Stuff at 18 sc so there is enough space. Place safety eyes before stuffing. Fasten Off.
Finishing Up
1: Work two 4 dc bobbles into the body for arms (one bobble on top of the other for each arm). I had to use different colours to do this.
2: Add another 4 dc bobble to the head and a 4 ch chain to make the “ponytail”, if you have any yarn left at this stage.
3: Sew head and feet to the body.
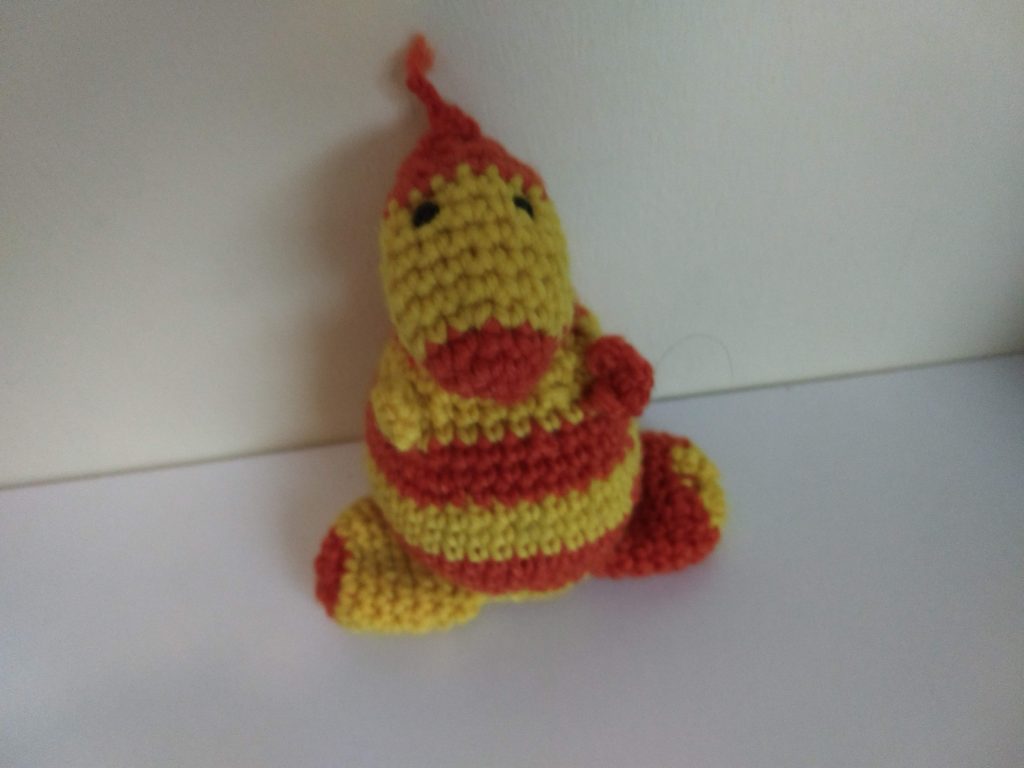
MOUSETEENIE
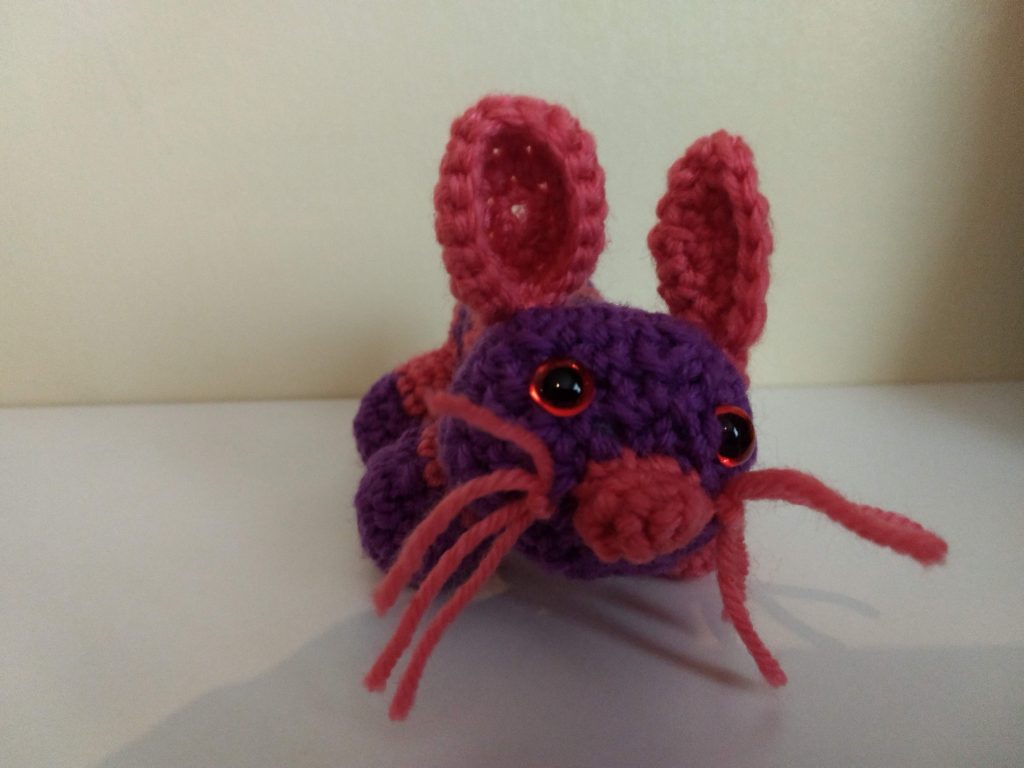
This little guy was my second attempt and I had a much better feel for how far 30 g of yarn would stretch by the time I made him, but I still needed to change colours on the legs (see below) to make it stretch out. You’ll need 10 mm safety eyes and toy stuffing to make Mouseteenie.
Body/Head
1: Work increases from 6-18 sc in the first colour (in my case this was purple)
2: Work 18 sc x 3 rounds in second colour (in my case this was pink)
3: Work 18 sc x 4 rounds in first colour
4: Repeat 2
5: Repeat 3
6: Repeat 2
7: Work increases from 24-30 sc in first colour. Work another 30 sc in the same colour
8: Work decreases from 24 – 6 sc all in the first colour. Start stuffing around 18 sc to make sure you have enough room. Place the eyes before stuffing using the photo as a guide. (I used 10 mm safety eyes with a slightly orangey-pink cast to match his body colours). Fasten Off.
Nose
1: Work the nose in the second colour (in my case this was pink).
2: Work 3 sc x 2 rounds, then work 5 sc x 2 rounds. Fasten Off
Legs (make 4)
1: Work increases from 6-18 sc in first colour (In my case this was purple), Work another 18 sc in first colour
2: Decrease to 12 sc in first colour
3: Work 12 sc x 3 rounds in second colour. Fasten Off.
Note: I had to swap the colours around on one of Mouseteenie’s legs to ensure that I had enough yarn. I made the whole of one leg in pink with a little ring of purple around it on that one leg as I didn’t have enough purple left to do the leg in the same way as the other three.
Ears
1: Work increases from 6 – 18 sc in second colour (in my case this was pink).
2: Work another 18 sc in second colour
Finishing Up
1: Using the crochet hook pull four strands of yarn in the second colour into the cheeks on each side of the face in the same way as you would create tassels on scarf. Cut these “whiskers” to size
2: Stuff the legs and sew to the underside of the body.
3: Sew the nose to the front of the head
4: Sew the ears to the top of the head
I did not have enough yarn left to make a tail, so I pulled yarn through from the sewing of one of the legs through the base of the body to act as a tail.
FLOWERTEENIE

I love making little creatures, but I wondered whether I could make something decorative using the 2Teenie method so I decided to design a flower (or Orlando Bloom as I like to call him in private ;)). You will need toy stuffing to make this Flowerteenie.
Flower Head
1: Work increases from 6-18 sc with first colour (in my case this was green)
2: Work increases from 24-30 sc in second colour (in my case this was orange/pink)
3: Work 30 sc in the second colour and another 30 sc in the back loops only
4: Work decreases from 24-6 sc all in the second colour. Start stuffing at around 18 sc to make sure you have enough room. Fasten Off.
5: Join the same yarn back in on one of the front loops from the round that was worked in the back loops only.
6: Work sl st; hdc; dc; hdc; sl st in the next 5 stitches (including the stitch where you joined the yarn). Repeat this sequence 6 times around and join with a sl st.
7: ch 1 (does not count as a st). Work sl st; dc; tr; dc; sl st in the first 5 stitches. Repeat this sequence 6 times around and join with a sl st.
8: ch 1 (does not count as a st). Work sl st; tr, dtr; tr; sl st in the first 5 stitches. Repeat this sequence 6 times around and join with a sl st. Fasten Off
Stem
1: Work in first colour (in my case this was green). Stuff the stem as you go along.
2: Work increases from 6-24 sc
3: Work decreases from 18 – 10 sc (In the final round decrease 1 sc at the start and the end of the round)
4: Work 10 sc x 17 rounds. Stuff as you go, but do not stuff last three rows as we’ll use these to sew the stem to the back of the flower head. Fasten Off.
Basket
1: Work increases from 6-30 sc in second colour (in my case this was orange/pink).
2: Work increase to 36 sc in first colour (in my case this was green). Work another 36 sc in the back loops only.
3: Work 36 sc in second colour
4: Work decreases from 30 to 34 sc in first colour
5: Work decrease to 18 sc in second colour. Fasten Off.
Leaves (make 2 in first colour)
1: ch 9. Work sc; hdc; dc, tr, tr, dc, hdc, sc into stitches from second chain from hook. Fasten Off.
Finishing Up
1: Sew flower stem base into the basket using the larger end.
2: Sew leaves onto stem using photo as a guide
3: Sew the unstuffed part of the stem onto the back of the flower head
BOBTEENIE
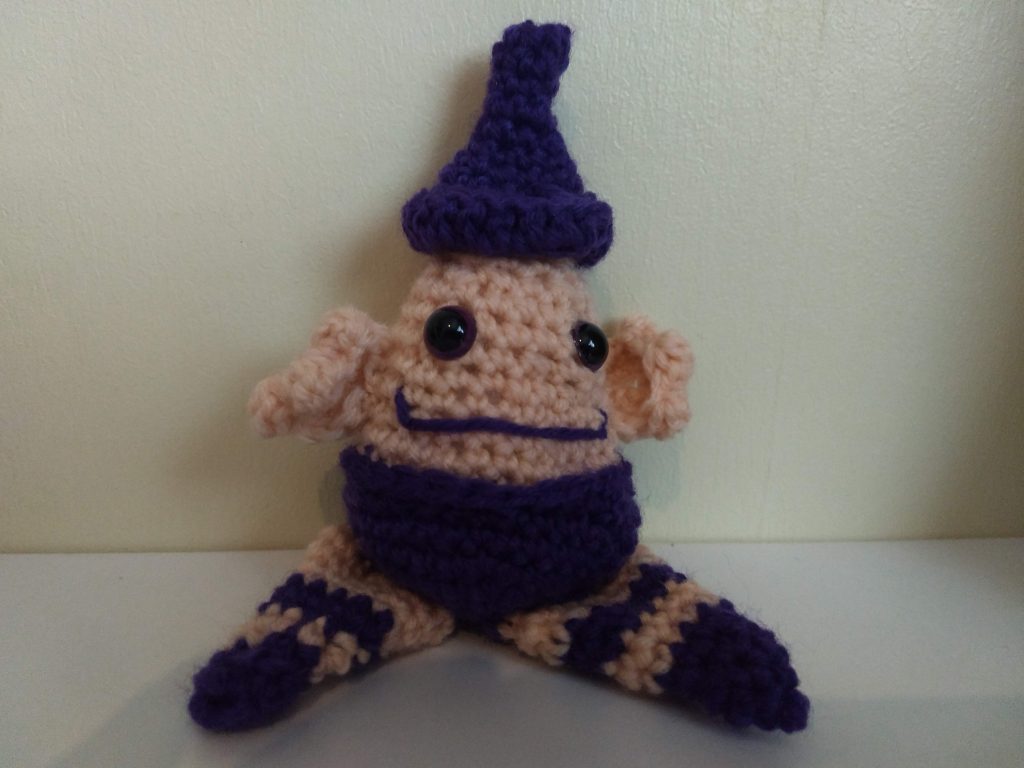
Bob was the last of the four 2teenies I created this time around. I’m not sure what he is, but he’s a very happy little chap. You’ll need some toy stuffing and 10 mm safety eyes to make Bobteenie.
Hat (all in first colour, in my case this was purple)
1: Start with 5 sc. Work another round of 5 sc.
2: Increase to 7 sc by increasing in the first and last stitches of the round. Work another round of 7 sc.
3: Increase to 9 sc by increasing in the first and last stitches of the round.
4: Increase to 11 sc by increasing in the first and last stitches of the round.
5: Increase to 13 sc by increasing in the first and last stitches of the round.
6: Increase to 17 sc by increasing in the first, second, second last and last stitches of the round. Work another round of 17 sc.
7: Increase to 19 sc by increasing in the first and last stitches of the round. Work in the back loops only.
8: Work 20 sc in the front loops of the previous round by increasing one stitch in the round. Fasten Off.
Body
1: Work increases from 6-36 sc in the first colour (in my case this was purple). Work another 2 rounds of 36 sc.
2: Decrease to 30 sc in the front loops only using the first colour.
3: Using the second colour (in my case this was salmon pink) work 30 sc in the back loops left over from the previous round.
4: Working in the second colour decrease to 24 sc and work two extra round of 24 sc.
5: Working in the second colour decrease to 18 and work another round of 18 sc. Start stuffing the body at this point so that you have enough room to work with.
6: Working in the second colour decrease to 12 sc and work another two rows of 12 sc.
7: Working in the second colour decrease to 6 sc. Fasten Off.
Feet (make 2. Swap the colours around on the second foot)
1: In first colour, work 6 sc x 3 rounds.
2: In first colour. Work increase to 8 sc by increasing in the first and last stitch of the round. Work another round of 8 sc.
3: In second colour increase to 10 sc by increasing in the first and last stitch of the round. Work another round of 10 sc.
4: In first colour increase to 12 sc by increasing in the first and last stitch of the round. Work another round of 12 sc.
5: In second colour increase to 18 sc and work another round of 18 sc.
6: In first colour decrease to 12 sc. Fasten Off.
Note: You will need to swap the colours around for the second foot, and it’s likely you will need to use more of the second colour on that foot. You could stuff the feet lightly if you like, but I did not stuff them.
Ear-Hands (make 2 in second colour)
1: Work increases from 6-12 sc directly into the body (see photo for placement).
2: Work 2 sc; 1x 3 dc bobble; 1 sc; 1 x 3 dc bobble, 1 sc, 1 x 3 dc bobble; 5 sc (12 sc). Fasten Off.
Finishing Up
1: Sew feet on to body.
2: The hat sits on Bobteenie’s head without needing to sewn on and I didn’t have any yarn left to sew it on anyway, but if you do and would prefer it to be sewn on, feel free to do so.
That’t it for this first batch of 2Teenies. Feel free to use the patterns if you like, but remember that you can’t distribute them as the copyright remains with me. Even better, try designing some of your own 2Teenies. The rules are restrictive enough to bring out your brilliant creativity!