Wood Sprite
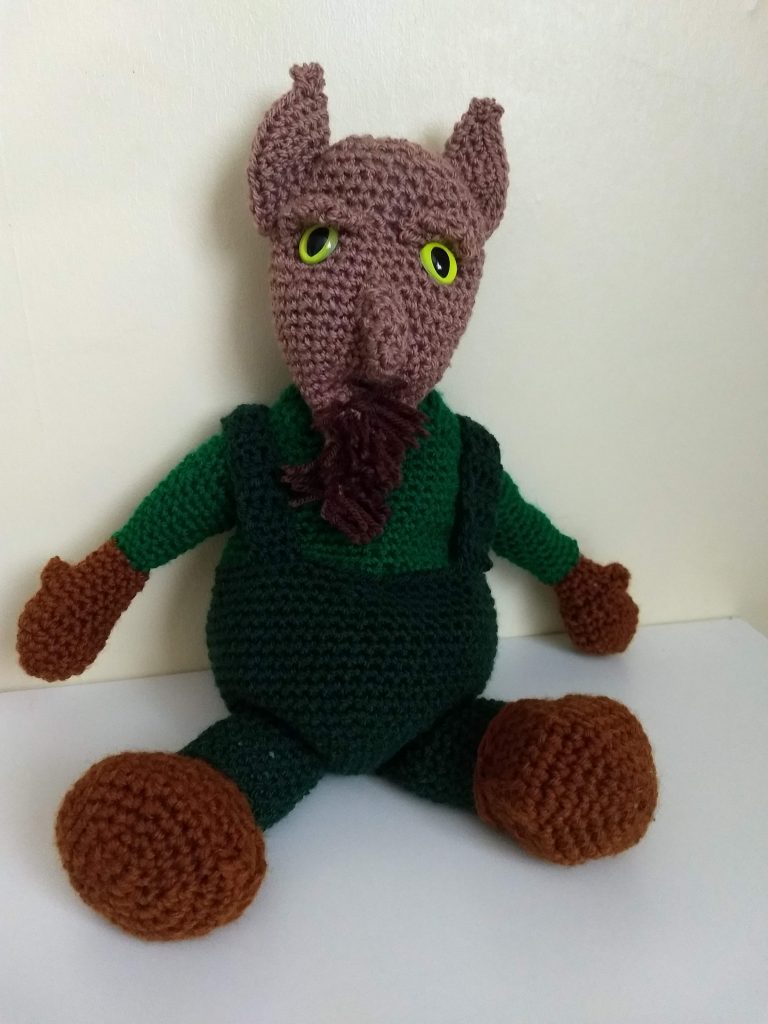
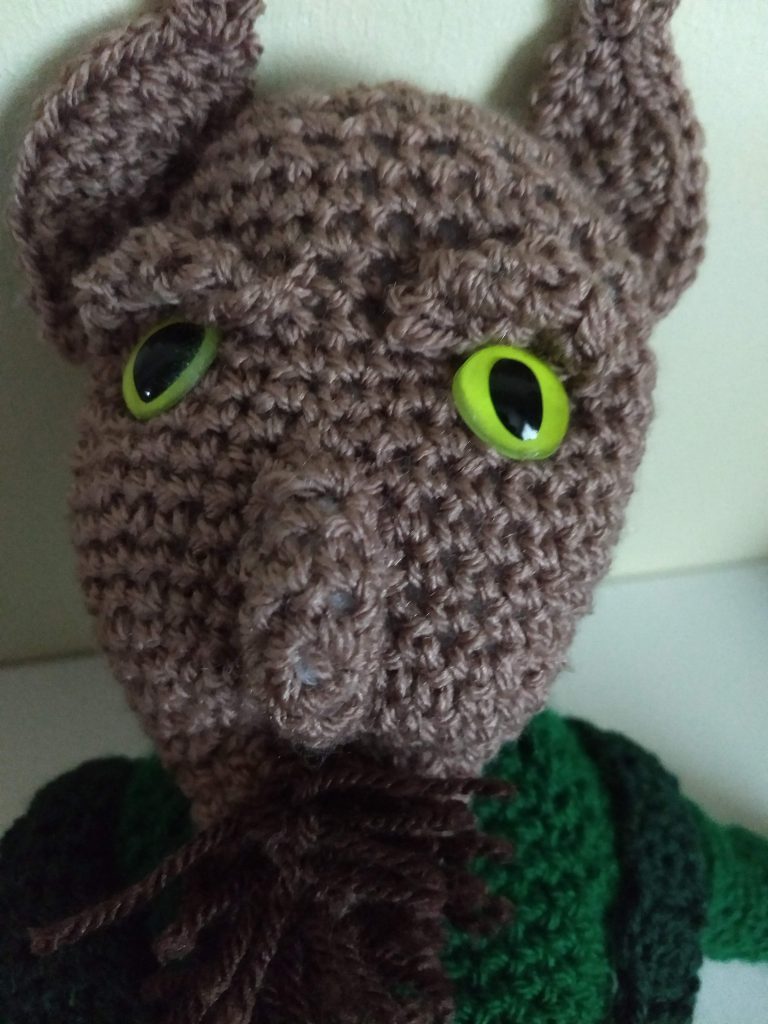
I decided I wanted to design a nature spirit, but not one that was all cute and cuddly like a fairy, because if they existed, I think they would be alien to us, and given what we’ve done to the planet, not particularly friendly. I wanted it to be something that would be scary to catch scuttling across the garden in the dead of night.
I also wanted to keep his colouring fairly sombre so that he could hide away amongst the greenery and in trees. I used three different shades of brown and two shades of green DK yarn. You can use any yarn you like. Mine were a mixture of DK yarns I had available. You’ll need less than a skein of each, with the dark green dungarees using the most yarn, around 60g. The list below details which yarns I used for each colour.
MATERIALS
- Approximately 300 g of DK Yarn
- 4 mm crochet hook
- Tapestry Needle
- Stitch marker
- Fibrefill Stuffing
- Two 20 mm “cat eye” toy safety eyes
You could make him look a bit less scary by using normal 20 mm safety eyes if you prefer.
Light Brown
Stylecraft Special DK Mocha (1064)
Medium Brown
This came from one of those packs you get with magazines and I’m not sure of the make. You can use any brown as long as it contrasts with the other two.
Dark Brown
Stylecraft Special DK Dark Brown (1004)
Light Green
I did not have the ball band for this one, but it is very close to the colour of Stylecraft Special DK Kelly Green (1826)
Dark Green
Stylecraft Special DK Green (1116)
You will also need a 4 mm crochet hook, fibrefill stuffing, a tapestry yarn needle and two 20 mm “cats eye” toy safety eyes. You could make him look a bit less scary by using normal 20 mm safety eyes if you prefer.
SKILL LEVEL
This is an easy pattern and suitable for a beginner. You will need to know how to increase and decrease and work in the back and front loops only. You will also need to know how to change colour.
TERMINOLOGY
Although I’m British, I use USA crochet terms because I find them more intuitive than the UK versions. I use the metric system for measurements.
sc – single crochet (UK = dc)
dc – double crochet (UK = tr)
hdc – half double crochet (UK = htr)
start(x) – (x) represents the number of starting stitches which will always be sc unless otherwise stated. You can either crochet 2 sc and crochet the starting stitches into the second sc, or use a magic ring. I prefer the first method myself.
inc – increase by working an extra stitch into the same stitch
dec – decrease by working one stitch across two stitches
ch – chain
sl st – slip stitch
BLO – back loops only
F/O – finish off
Y/O – yarn over
LEGS (with Dark Green, make 2)
Round 1: ch 18; join with a sl st
[Stuff the legs as you go along]
Rnds 2-8: 18 sc around
Round 9: 18 sc around in BLO
F/O
FEET (with Medium Brown, make 2)
Round 1: start(6)
Round 2: inc* – repeat * around (12)
Round 3: (1 sc, inc)* – repeat * around (18)
Round 4: (2 sc, inc)* – repeat * around (24)
Rnds 5-9: 24 sc around
[stuff the feet as you go along as you are going to join them to the legs]
Round 10: (2 sc, dec)* – repeat around (18)
Round 11: 18 sc around in the front loops of the leg left over from the final round
F/O
ARMS (with Light Green, make 2)
Round 1: ch 18; join with a sl st
[Stuff the arms as you go along]
Rnds 2-6: 18 sc around
Round 7: (1 sc, dec) * – repeat * around (12)
Rnds 8-14: 12 sc around
[turn the work inside out at this point]
Round 15: 12 sc around; F/O
[Rejoin Light Green Yarn in the first round of the arm and work as follows]:
Row 1: 9 sc; turn
Row 2: ch 1 [does not count as a stitch on any row]; 9 sc; turn
Row 3: ch 1; dec, 5 sc, dec; turn (7)
Row 4: ch 1; 7 sc; turn
Row 5: ch 1; dec, 3 sc, decl turn (5)
Row 6: ch 1; 5 sc; F/O
[This creates a flap that makes the arms easier to sew onto the body and creates a “shoulder”]
BODY (with Dark Green, Light Green)
Round 1: with Dark Green start(6)
Round 2: inc* – repeat * around (12)
Round 3: (1 sc, inc)* – repeat * around (18)
Round 4: (2 sc, inc)* – repeat * around (24)
Round 5: (3 sc, inc)* – repeat * around (30)
Round 6: (4 sc, inc)* – repeat * around (36)
Round 7: (5 sc, inc)* – repeat * around (42)
Round 8: (6 sc, inc)* – repeat * around (48)
Rnds 9-20: 48 sc around
Round 21: 48 sc around in the BLO, changing to Light Green on the last st
Round 22: 48 sc around
Round 23: (6 sc, dec)* – repeat * around (42)
Rnds 24-25: 42 sc around
Round 26: (5 sc, dec)* – repeat * around (36)
Rnds 27-33: 36 sc around
Round 34: (4 sc, dec)* – repeat * around (30)
[Start Stuffing and stiff as you go]
Rnds 35-36: 30 sc around
Round 37: (3 sc, dec)* – repeat * around (24)
Rnds 38-39: 24 sc around
Round 40: (2 sc, dec)* – repeat * around (18)
Round 41: 18 sc around
Round 42: (1 sc, dec)* – repeat * around (12)
Rnds 43-44: 12 sc around
F/O
HANDS (with Medium Brown, make 2)
Special Stitch: 4 dc bobble : Y/O hook; insert through stitch,Y/O, pull through 2 loops 4 times; pull through all remaining loops on the hook and sc to close.
Round 1: start(6)
Round 2: inc * – repeat * around (12)
Round 3: 12 sc around
Round 4: (1 sc, inc)* – repeat * around (18)
Rnds 5-6: 18 sc around
Round 7: (1 sc, dec)* – repeat * around (12)
Round 8: 12 sc around
Round 9: ch 1; 4 dc bobble; sl st down side of “thumb” back to hand body; 11 sc
Round 10: sl st back to top of “thumb”, 12 sc around
Round 11: 3 sc, dec, 3sc, dec, 2 sc (10)
Rnds 12-14: 10 sc around
F/O
HEAD (with Light Brown)
Round 1: start(3)
Round 2: 3 sc around
Round 3: inc, 1 sc, inc (5)
Round 4: 5 sc around
Round 5: inc, 3 sc, inc (7)
Round 6: 7 sc around
Round 7: inc, 5 sc, inc (9)
Round 8: inc, 7 sc, inc (11)
Round 9: inc, 9 sc, inc (13)
Round 10: inc, 10 sc, inc, inc (16)
Round 11: 16 sc around
Round 12: inc, 14 sc, inc (18)
Round 13: 18 sc around
Round 14: inc, 16 sc, inc (20)
Round 15: inc, inc, 16, inc, inc (24)
Round 16: (3 sc, inc)* – repeat * around (30)
Rnds 17-19: 30 sc around
[Place safety eyes, using image as a guide]
Round 20: (4 sc, inc)* – repeat * around (36)
Rnds 21-26: 36 sc around
Round 27: (4 sc, dec)* – repeat * around (30)
Rnds 28-29: 30 sc around
Round 30: (3 sc, dec)* – repeat * around (24)
Round 31: 24 sc around
Round 32: (2 sc, dec)* – repeat * around (18)
Round 33: (1 sc, dec)* – repeat * around (12)
Round 34: dec * – repeat * around (6)
F/O
EARS (with Light Brown, make 2)
Round 1: start(6)
Round 2: inc* – repeat * around (12)
Round 3: (1 sc, inc)* – repeat * around (18)
Round 4: (2 sc, inc)* – repeat * around (24)
Round 5: 24 sc around
[Fold over and sl st across; ch 1, 2 dc in the top of the ear]
F/O
NOSE (with Light Brown)
Special Stitch: 4 dc bobble : Y/O hook; insert through stitch,Y/O, pull through 2 loops 4 times; pull through all remaining loops on the hook and sc to close.
Round 1: start(6)
Round 2: inc* – repeat * around (12)
Round 3: 12 sc around
Round 4: 2 4 dc bobbles in the first 2 stitches; leave the rest unworked.
F/O
EYELIDS (with Light Brown, make 2)
Round 1: start(6)
Round 2: inc* – repeat * around (12)
Round 3: 12 sc around
F/O
ASSEMBLY
- Sew Hands to Arms
- Sew Arms to Body using the shoulder flaps to position
- Sew Ears on to Head
- Fold over Nose, elongate and stuff lightly before sewing to Head
- Using Dark Brown, draw little “hairs” through the chin in the same way that you would do it making a fringe for a scarf. Each “hair” consists of a length of yarn folded over and drawn through with the crochet hook and closed by pulling the yarn through the loop.
- Fold over eyelids and sew on to Head above the eyes.
- I used some Light Brown yarn to pull through from the front of where a mouth would be to the back of the head to give him a slightly indented area above the chin like a mouth. You could sew on a mouth if you are good at sewing.
- Using Dark Green, create two sets of dungaree straps by attaching the yarn to the appropriate spots on the Body and working enough rows of 4 hdc to be able to attach again at the back. You can choose to work the straps straight (as in the photo below) or cross them across the back – it’s up to you. Just make sure that they go over the shoulders
That’s it. You now have your own angry little wood sprite 🙂
The Legal Stuff
Copyright 2020- Cazimodo Creative by Caz Thomson. I am very happy for you to make and also sell items using this pattern, but please don’t sell or otherwise distribute the pattern itself. Please credit me with a link to the pattern if you do sell your finished item online.

